安装依赖
bash
sudo apt update
sudo apt install -y \
    build-essential \
    autoconf automake autotools-dev libtool \
    flex bison gawk gperf texinfo patchutils \
    bc \
    libgmp-dev libmpfr-dev libmpc-dev \
    libncurses-dev \
    zlib1g-dev libexpat-dev \
    pkg-config cmake ninja-build \
    git wget curl \
    python3 python3-pip python3-tomli \
    libglib2.0-dev libslirp-dev \
    qemu-system-misc \
    opensbi u-boot-qemu \
    e2fsprogs \
    meson ninja-build
建立工作目录
bash
export LFS=/home/lee/lfs
mkdir -pv $LFS/{sources,rootfs,cross-tools}
export PATH=$LFS/cross-tools/bin:$PATH
构建 RISC-V GNU 编译器工具链
开始想直接下载成品二进制,想了想好像和 lfs 精神不符,遂自行编译
bash
mkdir $LFS/cross-tools/riscv-gnu-toolchain
cd $LFS/sources
git clone https://github.com/riscv-collab/riscv-gnu-toolchain.git
cd riscv-gnu-toolchain
./configure --prefix=$LFS/cross-tools/riscv-gnu-toolchain
make linux
export PATH=$LFS/cross-tools/riscv-gnu-toolchain/bin:$PATH # 设置环境变量
bash
# 验证安装
riscv64-unknown-linux-gnu-gcc --version
riscv64-unknown-linux-gnu-g++ --version
根文件系统
需补齐根文件系统,否则会报错
bash
mount: mounting none on /proc failed: No such file or directory
mount: mounting none on /sys failed: No such file or directory
解决方案:
bash
# 创建 usr 下的真实目录和其他系统目录
mkdir -pv $LFS/rootfs/{usr/bin,usr/sbin,usr/lib,etc/systemd/system,var/log/journal,run,proc,sys,dev,tmp,root}

# 建立 Usr-Merge 软链接
ln -sv usr/bin $LFS/rootfs/bin
ln -sv usr/sbin $LFS/rootfs/sbin
ln -sv usr/lib $LFS/rootfs/lib
ln -sv usr/lib $LFS/rootfs/lib64
处理动态链接库
bash
sudo cp -a $LFS/cross-tools/riscv-gnu-toolchain/sysroot/lib/* $LFS/rootfs/usr/lib/libxcrypt
旧版: crypt() 在 glibc,新版 crypt() 被拆到 libxcrypt,需要手动安装
bash
cd $LFS/sources
wget https://github.com/besser82/libxcrypt/releases/download/v4.5.2/libxcrypt-4.5.2.tar.xz
tar xf libxcrypt-4.5.2.tar.xz
cd libxcrypt-4.5.2

./configure \
--host=riscv64-unknown-linux-gnu \
--prefix=/usr \
--disable-static

make -j$(nproc)
make DESTDIR=$LFS/rootfs install
GNU Bash
bash
cd $LFS/sources
wget https://ftp.gnu.org/gnu/bash/bash-5.3.tar.gz
tar -xf bash-5.3.tar.gz
cd bash-5.3

./configure --host=riscv64-unknown-linux-gnu \
            --prefix=/usr \
            --without-bash-malloc \
            --disable-nls

make -j$(nproc)
make DESTDIR=$LFS/rootfs install

# 确保 sh 指向 bash
ln -sfv bash $LFS/rootfs/usr/bin/sh
GNU Coreutils
bash
cd $LFS/sources
wget https://ftp.gnu.org/gnu/coreutils/coreutils-9.6.tar.xz
tar -xf coreutils-9.6.tar.xz
cd coreutils-9.6

# 交叉编译修正参数
./configure --host=riscv64-unknown-linux-gnu \
            --prefix=/usr \
            --enable-no-install-program=kill,uptime

make -j$(nproc)
make DESTDIR=$LFS/rootfs install
util-linux
Systemd 需要 util-linux 的部分组件
bash
cd $LFS/sources
wget https://mirrors.edge.kernel.org/pub/linux/utils/util-linux/v2.39/util-linux-2.39.3.tar.xz
tar xf util-linux-2.39.3.tar.xz
cd util-linux-2.39.3
bash
./configure --host=riscv64-unknown-linux-gnu \
            --prefix=/usr \
            --disable-all-programs \
            --disable-nls \
            --enable-libblkid \
            --enable-libmount \
            --enable-agetty \
            --enable-mount \
            --enable-unshare \
            --without-python \
            --without-systemd \
            --without-tinfo \
            --without-ncurses \
            --without-ncursesw

make -j$(nproc)
sudo PATH="$PATH" LFS="$LFS" make DESTDIR="$LFS/rootfs" install -i
Systemd
bash
cd $LFS/sources
git clone https://github.com/systemd/systemd.git
cd systemd

cat > meson.cross <<EOF
[binaries]
c = 'riscv64-unknown-linux-gnu-gcc'
cpp = 'riscv64-unknown-linux-gnu-g++'
ar = 'riscv64-unknown-linux-gnu-ar'
strip = 'riscv64-unknown-linux-gnu-strip'
pkgconfig = 'pkg-config'

[host_machine]
system = 'linux'
cpu_family = 'riscv64'
cpu = 'riscv64'
endian = 'little'

[properties]
sys_root = '$LFS/rootfs'
EOF
bash
cd $LFS/sources/systemd

# Systemd的许多测试关不掉,逐个支持会a依赖b b依赖c c又依赖d,无穷尽也,故让我们骗过构建系统。

cat << 'EOF' >> src/basic/log.c

/* ====== LFS Cross-Compile Dummy Patch ====== */

/* --- 1. Prototypes (先声明,绕过 -Wmissing-prototypes 检查) --- */
void test_prepare(void);
void log_test_failed_internal(void);
int run_test_table(void);
void test_setup_logging(void);
const char* get_testdata_dir(void);
void assert_signal_internal(void);
int slow_tests_enabled(void);
int enter_cgroup_subroot(void);
int setup_fake_runtime_dir(void);
int userns_has_single_user(void);
int can_memlock(void);
int have_namespaces(void);
int ci_environment(void);
const char* get_catalog_dir(void);
int write_tmpfile(void);

/* --- 2. Definitions (后定义,绕过 ld 链接器的 undefined reference) --- */

/* 基础测试环境 */
void test_prepare(void) {}
void log_test_failed_internal(void) {}
int run_test_table(void) { return 0; }
void test_setup_logging(void) {}

/* 网络、日志与路径测试 */
const char* get_testdata_dir(void) { return "/tmp"; }
const char* get_catalog_dir(void) { return "/tmp"; }

/* 信号与慢速测试配置 */
void assert_signal_internal(void) {}
int slow_tests_enabled(void) { return 0; } /* 告诉它没开启慢速测试 */

/* 容器、权限与命名空间测试 */
int enter_cgroup_subroot(void) { return 0; }
int setup_fake_runtime_dir(void) { return 0; }
int userns_has_single_user(void) { return 0; } /* 默认返回假 */
int have_namespaces(void) { return 0; }

/* BPF 防火墙与 CI 环境测试 */
int can_memlock(void) { return 0; }
int ci_environment(void) { return 0; }

/* 环境变量与文件操作测试 */
int write_tmpfile(void) { return -1; } /* 直接返回-1表示写入失败,让测试程序跳过后续逻辑 */

/* ========================================================== */
EOF
bash
mkdir build && cd build

meson setup .. \
  --prefix=/usr \
  --cross-file=../meson.cross \
  --buildtype=release \
  -Dtests=false \
  -Dfuzz-tests=false \
  -Dinstall-tests=false \
  -Dman=false \
  -Dhtml=false \
  -Dblkid=enabled \
  -Dlibmount=enabled \
  -Dglib=false \
  -Dgnutls=false \
  -Dgcrypt=false \
  -Dopenssl=false \
  -Delfutils=false \
  -Dp11kit=false \
  -Dpcre2=false \
  -Dlibidn2=false \
  -Dlibcurl=false \
  -Dselinux=false \
  -Dapparmor=false \
  -Daudit=false \
  -Dseccomp=false \
  -Dkmod=false \
  -Dpam=false \
  -Dpolkit=false \
  -Dacl=false \
  -Dsmack=false \
  -Dima=false \
  -Dnetworkd=false \
  -Dtimesyncd=false \
  -Dmachined=false \
  -Dimportd=false \
  -Dhostnamed=false \
  -Dlocaled=false \
  -Dtimedated=false \
  -Dlogind=false \
  -Duserdb=false \
  -Dhomed=false \
  -Doomd=false \
  -Dnss-myhostname=false \
  -Dnss-systemd=false \
  -Dnss-resolve=false \
  -Dnss-mymachines=false

ninja -j$(nproc)

DESTDIR=$LFS/rootfs ninja install
登录配置
bash
# 简易登录脚本
cat << 'EOF' | sudo tee $LFS/rootfs/usr/bin/lfs-login
#!/bin/sh
# 1. 强制设置基础环境变量 (因为跳过了 /bin/login)
export PATH=/usr/bin:/usr/sbin
export HOME=/root
export USER=root
export TERM=xterm-256color

# 2. 打印欢迎信息
echo -e "\033[1;32mStarting LFS for RISC-V...\033[0m"

# 3. 启动真正的 Bash,并强制进入登录模式 (读取 .bash_profile)
# 这样 root 字符串会被当做 $0 忽略,不会报错 "Is a directory"
exec /bin/bash --login
EOF

sudo chmod +x $LFS/rootfs/usr/bin/lfs-login

# 创建配置覆盖目录
sudo mkdir -p $LFS/rootfs/etc/systemd/system/serial-getty@ttyS0.service.d

# 写入自动登录配置
sudo cat << 'EOF' | sudo tee $LFS/rootfs/etc/systemd/system/serial-getty@ttyS0.service.d/override.conf
[Service]
ExecStart=
# -n: 不调用 login 程序
# -l: 指定我们的跳板脚本
# %I: 传递终端名称 (ttyS0)
ExecStart=-/usr/sbin/agetty --autologin root --noclear -n -l /usr/bin/lfs-login %I $TERM
EOF

systemd-machine-id-setup --root=$LFS/rootfs
bash
# 创建 passwd 文件,定义 root 用户(UID 0, GID 0, 根目录 /root, Shell 为 bash)
cat << EOF | sudo tee $LFS/rootfs/etc/passwd
root:x:0:0:root:/root:/bin/bash
EOF

# 创建 group 文件,定义 root 组
cat << EOF | sudo tee $LFS/rootfs/etc/group
root:x:0:
bin:x:1:
daemon:x:2:
sys:x:3:
adm:x:4:
tty:x:5:
disk:x:6:
lp:x:7:
mem:x:8:
kmem:x:9:
wheel:x:10:
EOF
内核构建
bash
cd $LFS/sources
wget https://cdn.kernel.org/pub/linux/kernel/v6.x/linux-6.6.10.tar.xz
tar -xf linux-6.6.10.tar.xz
cd linux-6.6.10

make ARCH=riscv CROSS_COMPILE=riscv64-unknown-linux-gnu- defconfig
关键配置追加
bash
cat >> .config << 'EOF'
CONFIG_VIRTIO_BLK=y          # 磁盘
CONFIG_VIRTIO_NET=y          # 网卡
CONFIG_VIRTIO_CONSOLE=y      # 控制台
CONFIG_HVC_RISCV_SBI=y       # SBI 控制台接口
CONFIG_SERIAL_8250=y         # 串口
CONFIG_SERIAL_8250_CONSOLE=y # 串口控制台
CONFIG_EXT4_FS=y             # 根文件系统
CONFIG_PCI=y                 # PCI 总线
CONFIG_VIRTIO_PCI=y          # VirtIO PCI 设备

CONFIG_DEVTMPFS=y
CONFIG_TMPFS=y
CONFIG_SYSFS=y
CONFIG_PROC_FS=y
CONFIG_FHANDLE=y

CONFIG_NET=y
CONFIG_INET=y

CONFIG_EPOLL=y
CONFIG_SIGNALFD=y
CONFIG_TIMERFD=y
CONFIG_FUTEX=y

CONFIG_CGROUPS=y
CONFIG_CGROUP_DEVICE=y
CONFIG_CGROUP_FREEZER=y
CONFIG_CGROUP_PIDS=y

CONFIG_SECCOMP=y
CONFIG_NAMESPACES=y
CONFIG_USER_NS=y
EOF
编译
bash
make ARCH=riscv CROSS_COMPILE=riscv64-unknown-linux-gnu- -j$(nproc) Image安装 fastfetch
宿主机交叉编译
bash
cd $LFS/sources
git clone https://github.com/fastfetch-cli/fastfetch.git
cd fastfetch
mkdir build && cd build
bash
cmake .. \
  -DCMAKE_SYSTEM_NAME=Linux \
  -DCMAKE_SYSTEM_PROCESSOR=riscv64 \
  -DCMAKE_C_COMPILER=riscv64-unknown-linux-gnu-gcc \
  -DCMAKE_EXE_LINKER_FLAGS="-static" \
  -DCMAKE_BUILD_TYPE=Release \
  -DENABLE_ZLIB=OFF

make -j$(nproc)

sudo install -Dm755 fastfetch $LFS/rootfs/usr/bin/fastfetch
自定义配色
bash
sudo mkdir -p $LFS/rootfs/usr/share/fastfetch

echo -e "\033[38;5;81m╭────────────────────────────────────────╮
\033[38;5;81m│\033[38;5;218m  ██╗     ███████╗███████╗               \033[38;5;81m│
\033[38;5;81m│\033[38;5;218m  ██║     ██╔════╝██╔════╝               \033[38;5;81m│
\033[38;5;15m│  ██║     █████╗  █████╗                \033[38;5;81m│
\033[38;5;218m│  ██║     ██╔══╝  ██╔══╝                \033[38;5;81m│
\033[38;5;218m│  ███████╗███████╗███████╗              \033[38;5;81m│
\033[38;5;15m│      Lee                              \033[38;5;81m│
\033[38;5;81m╰────────────────────────────────────────╯\033[0m" | sudo tee $LFS/rootfs/usr/share/fastfetch/lee.txt
修改配置文件
bash
sudo mkdir -p $LFS/rootfs/etc/fastfetch

sudo tee $LFS/rootfs/etc/fastfetch/config.jsonc <<EOF
{
  "logo": {
    "source": "/usr/share/fastfetch/lee.txt",
    "type": "file"
  },
  "modules": [
    "os",
    "kernel",
    "uptime",
    "memory",
    "packages",
    "shell",
    "cpu"
  ]
}
EOF
开机自启
bash
# 创建 root 目录
sudo mkdir -p $LFS/rootfs/root

# 写入登录配置
cat << EOF | sudo tee $LFS/rootfs/root/.bash_profile
echo "****************************************"
echo "   Welcome to Lee's RISC-V LFS system!"
echo "      System kernel:\$(uname -r)"
echo "****************************************"
fastfetch

export PS1='[\u@lfs \W]\$ '
EOF

# 软链接 .bashrc
sudo ln -sfv .bash_profile $LFS/rootfs/root/.bashrc
镜像制作
bash
cd $LFS
dd if=/dev/zero of=lfs-glibc-riscv64.img bs=1M count=1024
sudo /usr/sbin/mkfs.ext4 lfs-glibc-riscv64.img

sudo mkdir -p /mnt/tmp-boot

sudo mount -o loop lfs-glibc-riscv64.img /mnt/tmp-boot
sudo cp -a rootfs/* /mnt/tmp-boot/
sync
sudo umount /mnt/tmp-boot
启动
bash
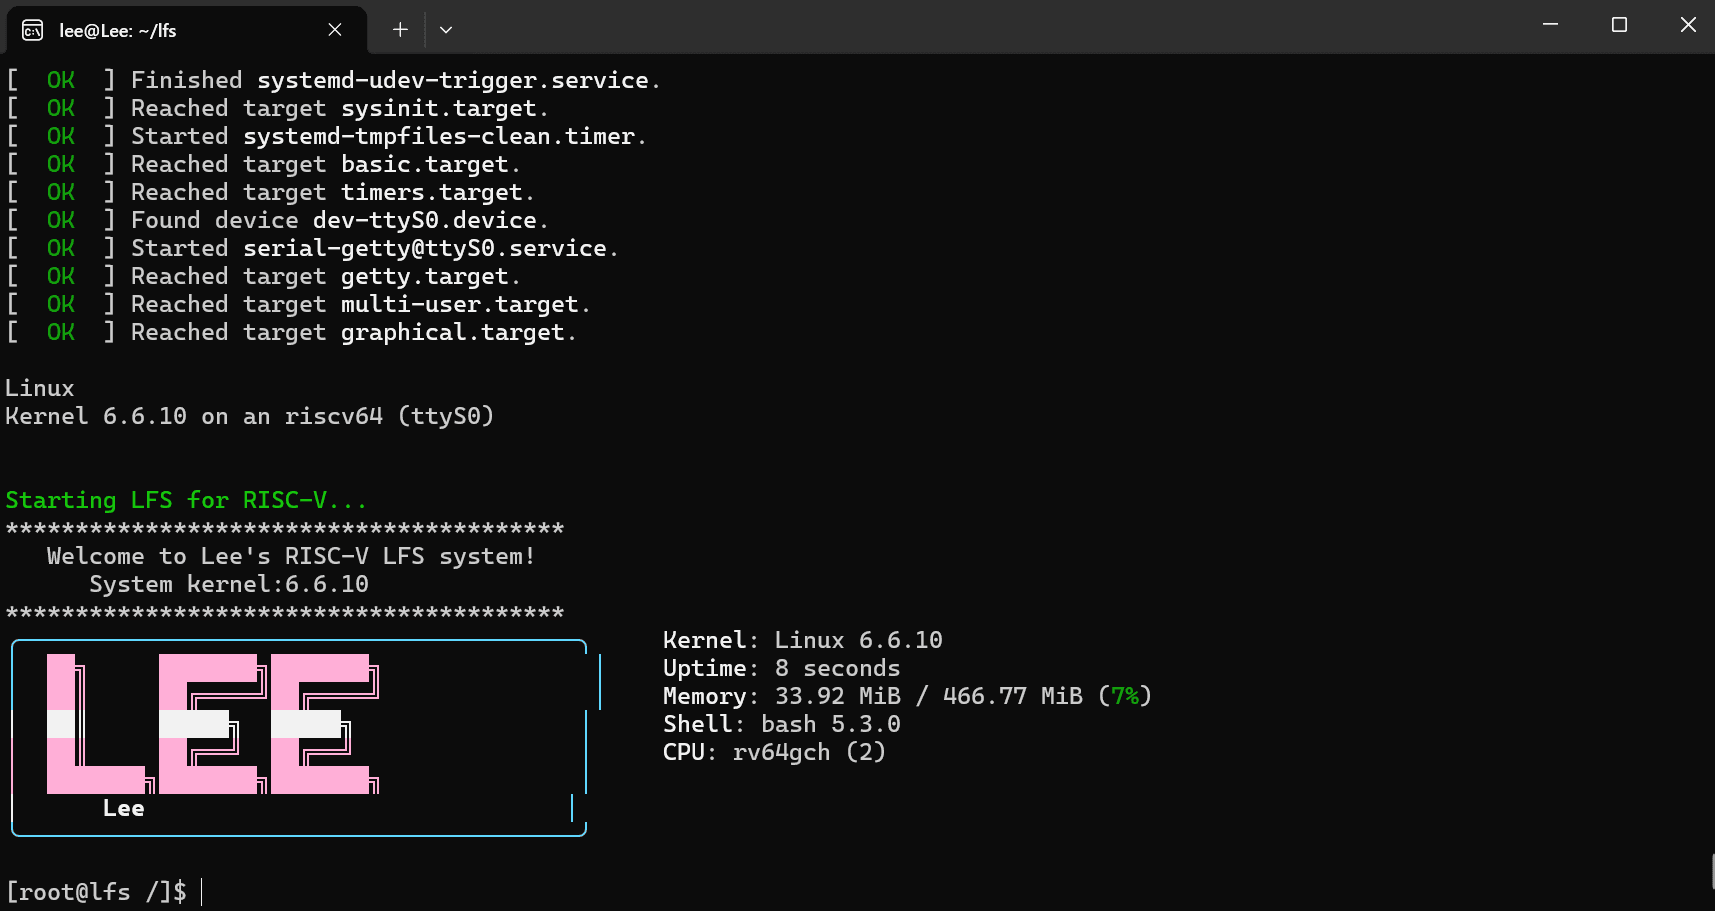
qemu-system-riscv64 \
    -machine virt \
    -m 512M \
    -smp 2 \
    -bios default \
    -kernel $LFS/sources/linux-6.6.10/arch/riscv/boot/Image \
    -drive file=$LFS/lfs-glibc-riscv64.img,format=raw,if=virtio \
    -append "root=/dev/vda rw console=ttyS0 init=/usr/lib/systemd/systemd" \
    -nographic